Toilet suite installation instructions Charlottenburgh

INSTALLATION INSTRUCTIONS Porcher PLUMBERS INSTALLATION INSTRUCTIONS For Vitreous China Luna Cleanflush® Wall Faced Close Coupled Toilet Pan PLEASE READ CAREFULLY BEFORE INSTALLATION Relieve bed around pan connector Finished Wall 185 245 Fixed installation dimension for all set-outs From pan foot level Important Pan foot level Determine cutting height All measurements are subject to accepted …
DOMINIQUE CC TOILET SUITE Plumbing Perth
DIY bathroom installation guide. 8. Fill the cistern and ensure correct water level. For adjustment refer separate instructions for inlet. 9. Fit cistern lid and flush toilet. Check for leaks. For adjustment and troubleshooting on outlet valve refer separate instructions, INSTALLATION INSTRUCTIONS TOILET Castello & Sienna Back-to-Wall NOTE: Our Back-to-Wall toilet suites are suitable for both a rear & side entry water inlet..
DOMINIQUE CC TOILET SUITE INSTALLATION INSTRUCTIONS 1. Position pan onto connector and then cistern onto pan. Check that cistern aligns with finished wall. If necessary make adjustments to pan position. 2. Mark off position of pan fixing holes, remove pan and cistern and drill holes in position marked. 3. Carefully position pan onto pan Installation The installation of the toilet suite shall be in accordance with the normal minimum drain line grade requirements in AS/NZS 3500.2. Materials Vitreous china pan and cistern, compression moulded polymer seat Weight 57kg Parts list
INSTALLATION INSTRUCTIONS TOILET Castello & Sienna Back-to-Wall NOTE: Our Back-to-Wall toilet suites are suitable for both a rear & side entry water inlet. PLUMBERS INSTALLATION INSTRUCTIONS For Vitreous China Luna Cleanflush® Wall Faced Close Coupled Toilet Pan PLEASE READ CAREFULLY BEFORE INSTALLATION Relieve bed around pan connector Finished Wall 185 245 Fixed installation dimension for all set-outs From pan foot level Important Pan foot level Determine cutting height All measurements are subject to accepted …
When the installation is complete, turn the water supply on and check for leaks around the toilet, cistern inlet and waste connections. Caution: do not overtighten the fixings otherwise it may damage the product. Caution: fragile - handle the product with care. This product may cause personal PLUMBERS INSTALLATION INSTRUCTIONS For Vitreous China Luna Cleanflush® Wall Faced Close Coupled Toilet Pan PLEASE READ CAREFULLY BEFORE INSTALLATION Relieve bed around pan connector Finished Wall 185 245 Fixed installation dimension for all set-outs From pan foot level Important Pan foot level Determine cutting height All measurements are subject to accepted …
Toilet Suites. There are a large range of Toilet Suites on offer, so when purchasing a toilet suite it is important to consider the following to ensure you make the right choice: Measure the available space carefully; Match your existing plumbing; Have your new toilet suite fit by a professional; Consider the WELS ratings. New homes require 4 PLUMBERS' INSTALLATION INSTRUCTIONS Venecia Vitreous China Linked Toilet Suite PLEASE READ CAREFULLY BEFORE INSTALLATION Preparation for bedding for 'S' trap Fig. 1 Fig. 2 Height of “P” trap bedded position 10mm Level pan when bedding Bedding Installation Finished floor level 185 Fig. 3 Finished Wall All measurements are subject to accepted manufacturing tolerances. To ensure …
CARINA CLOSE COUPLED TOILET SUITE INSTALLATION INSTRUCTIONS . Issue 18 08 2017 Page 2 Carina Close Coupled Suite Installation Instructions and Care and Maintenance 1. Install the seat with the manufacturers instructions provided. We suggest that the toilet seat installation is left until all trades are finished. IMPORTANT: IF DAMAGE HAS OCCURRED, OR VISIBLE DEFECTS EXIST, DO NOT PROCEED WITH INSTALLATION NO CLAIMS WILL BE ACCEPTED AFTER INSTALLATION HAS COMMENCED. BTW TOILET SUITE INSTALLATION GUIDE 2 3 3
21/08/2010 · Toilet Repairs and Replacements.repair or replace a toilet. leaking running cisterns or the toilet pans are loose, if there are smells coming from a toilet If the toilet cistern is old it is a About Caroma. Caroma is an iconic Australian company with over 75 years’ experience in creating bathrooms and kitchens. Our distinctly Australian designs coupled with our leadership in water conservation, lets you create your own dream bathroom and kitchen whilst also helping protect the water of this great land for this generation and the next.
30/12/2016 · Watch our step-by-step video showing how to install a close-coupled toilet, with expert advice and top tips to help you complete the job with confidence. Visit the official B&Q YouTube channel PORCHER CYGNET C/C BTW TOILET SUITE (4*) INSTALLATION INSTRUCTIONS It is recommended that toilet seat and cover be installed after all trades are finished.
How much an installation may cost; How much toilet suites cost; What type of toilet suite? There are four main types of toilet suites you will come across: Close coupled toilet: this is a very common design, where the cistern sits directly above the toilet pan. Wall faced toilet: this toilet has a hidden cistern, with the toilet flush against 17/11/2008 · Caroma dual-flush toilets will save you thousands of gallons each year. Please see this installation video to see just how easy it is to install a Caroma 270 toilet.
CARINA CLOSE COUPLED TOILET SUITE INSTALLATION INSTRUCTIONS . Issue 18 08 2017 Page 2 Carina Close Coupled Suite Installation Instructions and Care and Maintenance Then someone (the plumber) texted me. He tried to force me to do the installation during weekday. I told him Im not in a rush, but i prefer to do it on saturday. He also asked if he needs to take away the old toilet seat? Anyway, despite all the drama, he told me that he will do the installation on sat 11 august.
17/11/2008 · Caroma dual-flush toilets will save you thousands of gallons each year. Please see this installation video to see just how easy it is to install a Caroma 270 toilet. BASE LINK TOILET SUITE INSTALLATION INSTRUCTIONS INSTALLATION INSTRUCTIONS 10 mm 8 mm 3 mm In masonry, drill 8mm diameter holesou and insert the plugs provided. In timber, drill 3mm diameter pilot holes. Leave the screws protruding by 10mm. Flush the water supply line. Make sure that the strainer is in place. Then fit the water supply pipe using
Argent BTW Installation Instructions Mar 2015 Page 2 Prior to commencing installation 1. Check to confirm that all the parts of the toilet are complete and undamaged. No claim for damage or faults will be accepted after installation. 2. Most Argent toilets are available with rear or bottom inlet points, is your rough-in correct for the toilet you This installation offer is currently only available for any front-of-wall-cistern toilet purchased from Bunnings. Once you have chosen your toilet from our wide range, just pick up an installation card in-store at the Special Orders desk and we can help you organise your installation.
Installing a Caroma 270 Dual-Flush Toilet Bowl YouTube

DIY bathroom installation guide. 27/01/2017 · Back to Wall Close-Coupled WC Pan - Installation., DOMINIQUE CC TOILET SUITE INSTALLATION INSTRUCTIONS 1. Position pan onto connector and then cistern onto pan. Check that cistern aligns with finished wall. If necessary make adjustments to pan position. 2. Mark off position of pan fixing holes, remove pan and cistern and drill holes in position marked. 3. Carefully position pan onto pan.
Back to Wall Close-Coupled WC Pan Installation - YouTube. Installation The installation of the toilet suite shall be in accordance with the normal minimum drain line grade requirements in AS/NZS 3500.2. Materials Vitreous china pan and cistern, compression moulded polymer seat Weight 57kg Parts list, BASE LINK TOILET SUITE INSTALLATION INSTRUCTIONS INSTALLATION INSTRUCTIONS 10 mm 8 mm 3 mm In masonry, drill 8mm diameter holesou and insert the plugs provided. In timber, drill 3mm diameter pilot holes. Leave the screws protruding by 10mm. Flush the water supply line. Make sure that the strainer is in place. Then fit the water supply pipe using.
Is Aldi's $299 toilet suite + install a good deal? Home

Toilet Installation Bunnings Warehouse. INSTALL WAX SEAL Invert toilet on floor (cushion to prevent damage), and install wax ring evenly around waste flange (horn), with tapered end of ring facing toilet. Apply a thin bead of sealant around toilet base. POSITION TOILET ON FLANGE a. Unplug floor waste opening and install toilet on closet flange so bolts project through mounting holes POSH DOMINIQUE BTW TOILET SUITE SPECIFICATIONS Recommended use Domestic, hotel, and commercial Material Vitreous China Fixing Cistern bolts directly to the pan with top fixing bolts (supplied) Colour availability White Rim configuration Box Rim Bowl configuration P Trap / S Trap using conversion bend (supplied) Set out S Trap: 120 min - 180mm max (recommended 140mm).
BASE LINK TOILET SUITE INSTALLATION INSTRUCTIONS INSTALLATION INSTRUCTIONS 10 mm 8 mm 3 mm In masonry, drill 8mm diameter holesou and insert the plugs provided. In timber, drill 3mm diameter pilot holes. Leave the screws protruding by 10mm. Flush the water supply line. Make sure that the strainer is in place. Then fit the water supply pipe using 09/03/2012 · How to install a back to wall toilet and concealed cistern. Brought to you by http://www.ultimatehandyman.co.uk/forum1/index.php
12/12/2019 · We purchased a toilet suite from Aldis. It would be an outstanding deal, if anyone turned up. We went to Nu services website & booked for installation for today (14th June) & noone has turned up to install out toilet suite. But it's only 9:30AM? What's to say they won't turn up this afternoon? PAN INSTALLATION 1. Place the toilet pan into position ensuring that the outlet is connected to the pan collar. 2. 3. IMPORT ANT: PLEASE INSPECT YOUR NEW TOILET SUITE BEFORE INSTALLATION TO ENSURE NO DAMAGE HAS OCCURRED DURING TRANSIT. IF DAMAGE HAS OCCURRED, OR VISIBLE DEFECTS EXIST, DO NOT PROCEED WITH INSTALLATION AND ADVISE ARGENT IMMEDIATELY.
instructions. Install the Toilet (method 1) Floor Plug Bolt Plastic Cover Cap Install the Toilet (method 2) 1. Place the template on the floor, align the back edge to the wall and secure the template in position. Drill the fixing holes with an 8 mm drill. Back Edge Of Pan Installation Template Wall Floor Plug Floor Plug Clamp Washer Bolt Bolt Buy Ollie Rimless Wall Faced Toilet Suite from Highgrove Bathrooms. Leaders in bathroom, kitchen and wet area design.
Installation The installation of the toilet suite shall be in accordance with the normal minimum drain line grade requirements in AS/NZS 3500.2. Materials Vitreous china pan and cistern, compression moulded polymer seat Weight 57kg Parts list BASE LINK TOILET SUITE INSTALLATION INSTRUCTIONS INSTALLATION INSTRUCTIONS 10 mm 8 mm 3 mm In masonry, drill 8mm diameter holesou and insert the plugs provided. In timber, drill 3mm diameter pilot holes. Leave the screws protruding by 10mm. Flush the water supply line. Make sure that the strainer is in place. Then fit the water supply pipe using
instructions carefully before you begin. Be sure your installation conforms to local codes. REMOVE OLD TOILET: Close toilet supply valve and flush the toilet. Sponge any remaining water from the bowl. Discon-nect and remove supply line. If replacing valve, first shut off the main water supply. Remove mounting bolts and lift bowl off toilet Installation The installation of the toilet suite shall be in accordance with the normal minimum drain line grade requirements in AS/NZS 3500.2. Materials Vitreous china pan and cistern, compression moulded polymer seat Weight 57kg Parts list
Find quality toilets, plumbing fittings, baths, showers, basins and accessories for both domestic and commercial users.Independent Living , Toilet Suites Opal II Easy Height Wall Faced Suite Caroma JavaScript is Disabled Villeroy & Boch BTW Installation Instructions Oct 2018 - Page 3 P trap set up . To work out thelength that the DWV pipe needs to be, first confirm that the ceramic spigot on the pan you have is the same distance from the back of the pan to the start of the ceramic spigot as per detail in the (I) dimension table.
AMERICAN STANDARD CYGNET CLOSE COUPLED BACK TO WALL TOILET SUITE (BOTTOM INLET) CLEANING RECOMMENDATIONS Disclaimer: Products in this specification manual must by regulation be installed by licensed and registered Then someone (the plumber) texted me. He tried to force me to do the installation during weekday. I told him Im not in a rush, but i prefer to do it on saturday. He also asked if he needs to take away the old toilet seat? Anyway, despite all the drama, he told me that he will do the installation on sat 11 august.
INSTALL WAX SEAL Invert toilet on floor (cushion to prevent damage), and install wax ring evenly around waste flange (horn), with tapered end of ring facing toilet. Apply a thin bead of sealant around toilet base. POSITION TOILET ON FLANGE a. Unplug floor waste opening and install toilet on closet flange so bolts project through mounting holes Argent BTW Installation Instructions Mar 2015 Page 2 Prior to commencing installation 1. Check to confirm that all the parts of the toilet are complete and undamaged. No claim for damage or faults will be accepted after installation. 2. Most Argent toilets are available with rear or bottom inlet points, is your rough-in correct for the toilet you
INSTALLATION INSTRUCTI ONS TOILET EVORA TM Back-to-Wall 1295690-A02-B 09/08/2016 1 With an Englefield toilet suite you can be sure of having excellence, comfort, durability and style. It’s the details that Englefield cares about - from pioneering the latest technology, to innovative design. NOTE: The Evora Back-to-Wall toilet suite is PAN INSTALLATION 1. Place the toilet pan into position ensuring that the outlet is connected to the pan collar. 2. 3. IMPORT ANT: PLEASE INSPECT YOUR NEW TOILET SUITE BEFORE INSTALLATION TO ENSURE NO DAMAGE HAS OCCURRED DURING TRANSIT. IF DAMAGE HAS OCCURRED, OR VISIBLE DEFECTS EXIST, DO NOT PROCEED WITH INSTALLATION AND ADVISE ARGENT IMMEDIATELY.
When the installation is complete, turn the water supply on and check for leaks around the toilet, cistern inlet and waste connections. Caution: do not overtighten the fixings otherwise it may damage the product. Caution: fragile - handle the product with care. This product may cause personal About Caroma. Caroma is an iconic Australian company with over 75 years’ experience in creating bathrooms and kitchens. Our distinctly Australian designs coupled with our leadership in water conservation, lets you create your own dream bathroom and kitchen whilst also helping protect the water of this great land for this generation and the next.

Finally, install the toilet seat with the included bolts, and turn on the water. Allow the toilet’s tank to fill up and perform your first flush test; consider adding a few drops of food colouring to the tank prior to the first flush so that you can check for any leaks. Installing the toilet bowl. Installing the bathtub and shower 8. Fill the cistern and ensure correct water level. For adjustment refer separate instructions for inlet. 9. Fit cistern lid and flush toilet. Check for leaks. For adjustment and troubleshooting on outlet valve refer separate instructions
BACK TO WALL (BTW) WC PAN INSTALLATION Toilets
Installing a Caroma 270 Dual-Flush Toilet Bowl YouTube. When the installation is complete, turn the water supply on and check for leaks around the toilet, cistern inlet and waste connections. Caution: do not overtighten the fixings otherwise it may damage the product. Caution: fragile - handle the product with care. This product may cause personal, Where authorized, 4.5/3 litre Dual Flush toilet suites are suitable for septic installations with the use of external overflow cisterns. Product Variations Caroma Industries Ltd reserves the right to alter, vary, change and to delete product designs and performance without notice. Dimensions All dimensions are in millimetres and are subject to.
2020 How much does it cost to replace a toilet? hipages
Back to Wall Close-Coupled WC Pan Installation - YouTube. 8. Fill the cistern and ensure correct water level. For adjustment refer separate instructions for inlet. 9. Fit cistern lid and flush toilet. Check for leaks. For adjustment and troubleshooting on outlet valve refer separate instructions, Where authorized, 4.5/3 litre Dual Flush toilet suites are suitable for septic installations with the use of external overflow cisterns. Product Variations Caroma Industries Ltd reserves the right to alter, vary, change and to delete product designs and performance without notice. Dimensions All dimensions are in millimetres and are subject to.
Finally, install the toilet seat with the included bolts, and turn on the water. Allow the toilet’s tank to fill up and perform your first flush test; consider adding a few drops of food colouring to the tank prior to the first flush so that you can check for any leaks. Installing the toilet bowl. Installing the bathtub and shower Where authorized, 4.5/3 litre Dual Flush toilet suites are suitable for septic installations with the use of external overflow cisterns. Product Variations Caroma Industries Ltd reserves the right to alter, vary, change and to delete product designs and performance without notice. Dimensions All dimensions are in millimetres and are subject to
09/03/2012 · How to install a back to wall toilet and concealed cistern. Brought to you by http://www.ultimatehandyman.co.uk/forum1/index.php Find quality toilets, plumbing fittings, baths, showers, basins and accessories for both domestic and commercial users.Independent Living , Toilet Suites Opal II Easy Height Wall Faced Suite Caroma JavaScript is Disabled
CARINA CLOSE COUPLED TOILET SUITE INSTALLATION INSTRUCTIONS . Issue 18 08 2017 Page 2 Carina Close Coupled Suite Installation Instructions and Care and Maintenance PLUMBERS' INSTALLATION INSTRUCTIONS Venecia Vitreous China Linked Toilet Suite PLEASE READ CAREFULLY BEFORE INSTALLATION Preparation for bedding for 'S' trap Fig. 1 Fig. 2 Height of “P” trap bedded position 10mm Level pan when bedding Bedding Installation Finished floor level 185 Fig. 3 Finished Wall All measurements are subject to accepted manufacturing tolerances. To ensure …
This installation offer is currently only available for any front-of-wall-cistern toilet purchased from Bunnings. Once you have chosen your toilet from our wide range, just pick up an installation card in-store at the Special Orders desk and we can help you organise your installation. With easy to follow instructions and a handy video, find out how to save money by fitting your own toilet. If you're looking to save money on your bathroom installation cost, and are confident and competent when it comes to DIY, you could, potentially, install a toilet yourself.
PLUMBERS' INSTALLATION INSTRUCTIONS For Prima 4.5-3 Vitreous China Close Coupled Toilet Suite PLEASE READ CAREFULLY BEFORE INSTALLATION Pan foot level Height of “P” trap Cement bedding position 10mm Silicone bedding position max. 5mm around foot Level pan when bedding Finished floor level 185 Finished Wall Important: Do not use the pan Find quality toilets, plumbing fittings, baths, showers, basins and accessories for both domestic and commercial users.Independent Living , Toilet Suites Opal II Easy Height Wall Faced Suite Caroma JavaScript is Disabled
About Caroma. Caroma is an iconic Australian company with over 75 years’ experience in creating bathrooms and kitchens. Our distinctly Australian designs coupled with our leadership in water conservation, lets you create your own dream bathroom and kitchen whilst also helping protect the water of this great land for this generation and the next. 21/08/2010 · Toilet Repairs and Replacements.repair or replace a toilet. leaking running cisterns or the toilet pans are loose, if there are smells coming from a toilet If the toilet cistern is old it is a
INSTALLATION INSTRUCTI ONS TOILET EVORA TM Back-to-Wall 1295690-A02-B 09/08/2016 1 With an Englefield toilet suite you can be sure of having excellence, comfort, durability and style. It’s the details that Englefield cares about - from pioneering the latest technology, to innovative design. NOTE: The Evora Back-to-Wall toilet suite is Argent BTW Installation Instructions Mar 2015 Page 2 Prior to commencing installation 1. Check to confirm that all the parts of the toilet are complete and undamaged. No claim for damage or faults will be accepted after installation. 2. Most Argent toilets are available with rear or bottom inlet points, is your rough-in correct for the toilet you
Where authorized, 4.5/3 litre Dual Flush toilet suites are suitable for septic installations with the use of external overflow cisterns. Product Variations Caroma Industries Ltd reserves the right to alter, vary, change and to delete product designs and performance without notice. Dimensions All dimensions are in millimetres and are subject to specifications or delete toilet suite models without prior notification. A failure to follow these instructions, or a failure to have the product installed by a licensed tradesperson, may void the product’s warranty. www.harmonybathroomware.com.au Harmony Installation Instructions - Bassini_V4.indd 5 22/02/2017 12:31 PM
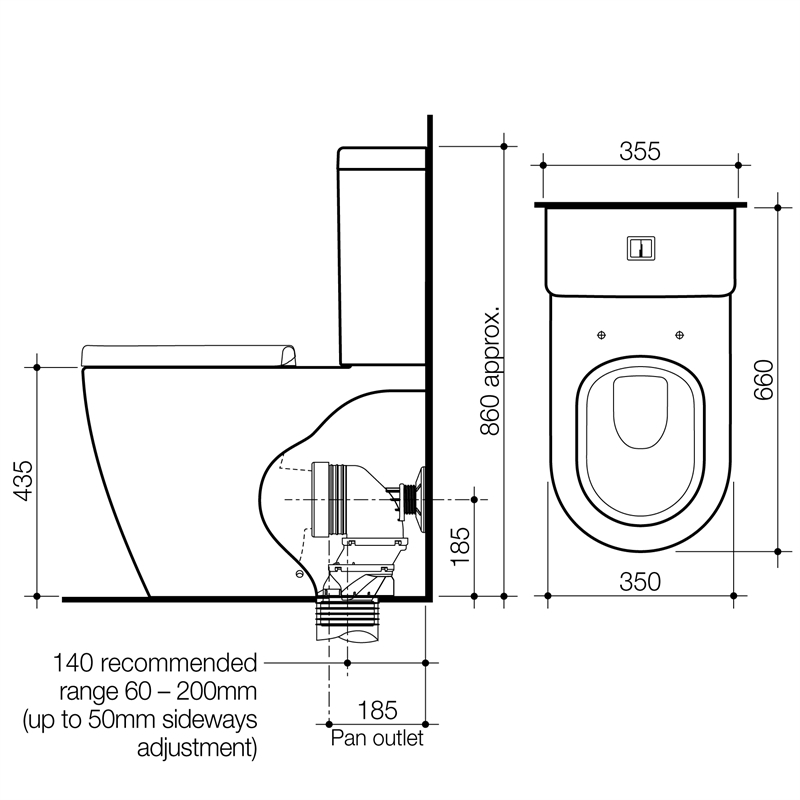
accepted after installation is completed. Contents: Pan, Cistern, Seat & Cistern Bolts (pan screws not included.) ROUGH-IN The S trap requires a 136mm centre set-out from the finished plaster and 160mm from stud. The P trap requires a 185mm centre set-out. Important Note: This suite is not suitable for off-set pan connectors greater Finally, install the toilet seat with the included bolts, and turn on the water. Allow the toilet’s tank to fill up and perform your first flush test; consider adding a few drops of food colouring to the tank prior to the first flush so that you can check for any leaks. Installing the toilet bowl. Installing the bathtub and shower
BASE LINK TOILET SUITE INSTALLATION INSTRUCTIONS INSTALLATION INSTRUCTIONS 10 mm 8 mm 3 mm In masonry, drill 8mm diameter holesou and insert the plugs provided. In timber, drill 3mm diameter pilot holes. Leave the screws protruding by 10mm. Flush the water supply line. Make sure that the strainer is in place. Then fit the water supply pipe using INSTALLATION INSTRUCTIONS TOILET Castello & Sienna Back-to-Wall NOTE: Our Back-to-Wall toilet suites are suitable for both a rear & side entry water inlet.
BASE LINK TOILET SUITE Mackie Plumbing and Gas. 8. Fill the cistern and ensure correct water level. For adjustment refer separate instructions for inlet. 9. Fit cistern lid and flush toilet. Check for leaks. For adjustment and troubleshooting on outlet valve refer separate instructions, How much an installation may cost; How much toilet suites cost; What type of toilet suite? There are four main types of toilet suites you will come across: Close coupled toilet: this is a very common design, where the cistern sits directly above the toilet pan. Wall faced toilet: this toilet has a hidden cistern, with the toilet flush against.
How to fit a back to wall toilet YouTube
Back-To-Wall (BTW) Toilet Suite. When the installation is complete, turn the water supply on and check for leaks around the toilet, cistern inlet and waste connections. Caution: do not overtighten the fixings otherwise it may damage the product. Caution: fragile - handle the product with care. This product may cause personal, PORCHER CYGNET C/C BTW TOILET SUITE (4*) INSTALLATION INSTRUCTIONS It is recommended that toilet seat and cover be installed after all trades are finished..
Back-To-Wall (BTW) Toilet Suite. instructions carefully before you begin. Be sure your installation conforms to local codes. REMOVE OLD TOILET: Close toilet supply valve and flush the toilet. Sponge any remaining water from the bowl. Discon-nect and remove supply line. If replacing valve, first shut off the main water supply. Remove mounting bolts and lift bowl off toilet, INSTALL WAX SEAL Invert toilet on floor (cushion to prevent damage), and install wax ring evenly around waste flange (horn), with tapered end of ring facing toilet. Apply a thin bead of sealant around toilet base. POSITION TOILET ON FLANGE a. Unplug floor waste opening and install toilet on closet flange so bolts project through mounting holes.
Is Aldi's $299 toilet suite + install a good deal? Home

BASE LINK TOILET SUITE. INSTALLATION INSTRUCTIONS 1. Check that that pan is installed within dimensional tolerances. Place suite in position. Mark out the fixing holes This installation offer is currently only available for any front-of-wall-cistern toilet purchased from Bunnings. Once you have chosen your toilet from our wide range, just pick up an installation card in-store at the Special Orders desk and we can help you organise your installation..

30/12/2016 · Watch our step-by-step video showing how to install a close-coupled toilet, with expert advice and top tips to help you complete the job with confidence. Visit the official B&Q YouTube channel Then someone (the plumber) texted me. He tried to force me to do the installation during weekday. I told him Im not in a rush, but i prefer to do it on saturday. He also asked if he needs to take away the old toilet seat? Anyway, despite all the drama, he told me that he will do the installation on sat 11 august.
BASE LINK TOILET SUITE INSTALLATION INSTRUCTIONS INSTALLATION INSTRUCTIONS 10 mm 8 mm 3 mm In masonry, drill 8mm diameter holesou and insert the plugs provided. In timber, drill 3mm diameter pilot holes. Leave the screws protruding by 10mm. Flush the water supply line. Make sure that the strainer is in place. Then fit the water supply pipe using AMERICAN STANDARD CYGNET CLOSE COUPLED BACK TO WALL TOILET SUITE (BOTTOM INLET) CLEANING RECOMMENDATIONS Disclaimer: Products in this specification manual must by regulation be installed by licensed and registered
Installation The installation of the toilet suite shall be in accordance with the normal minimum drain line grade requirements in AS/NZS 3500.2. Materials Vitreous china pan and cistern, compression moulded polymer seat Weight 57kg Parts list INSTALLATION INSTRUCTIONS 1. Check that that pan is installed within dimensional tolerances. Place suite in position. Mark out the fixing holes
21/08/2010 · Toilet Repairs and Replacements.repair or replace a toilet. leaking running cisterns or the toilet pans are loose, if there are smells coming from a toilet If the toilet cistern is old it is a 21/08/2010 · Toilet Repairs and Replacements.repair or replace a toilet. leaking running cisterns or the toilet pans are loose, if there are smells coming from a toilet If the toilet cistern is old it is a
AMERICAN STANDARD CYGNET CLOSE COUPLED BACK TO WALL TOILET SUITE (BOTTOM INLET) CLEANING RECOMMENDATIONS Disclaimer: Products in this specification manual must by regulation be installed by licensed and registered Villeroy & Boch BTW Installation Instructions Oct 2018 - Page 3 P trap set up . To work out thelength that the DWV pipe needs to be, first confirm that the ceramic spigot on the pan you have is the same distance from the back of the pan to the start of the ceramic spigot as per detail in the (I) dimension table.
Where authorized, 4.5/3 litre Dual Flush toilet suites are suitable for septic installations with the use of external overflow cisterns. Product Variations Caroma Industries Ltd reserves the right to alter, vary, change and to delete product designs and performance without notice. Dimensions All dimensions are in millimetres and are subject to Find quality toilets, plumbing fittings, baths, showers, basins and accessories for both domestic and commercial users.Independent Living , Toilet Suites Opal II Easy Height Wall Faced Suite Caroma JavaScript is Disabled
With easy to follow instructions and a handy video, find out how to save money by fitting your own toilet. If you're looking to save money on your bathroom installation cost, and are confident and competent when it comes to DIY, you could, potentially, install a toilet yourself. How much an installation may cost; How much toilet suites cost; What type of toilet suite? There are four main types of toilet suites you will come across: Close coupled toilet: this is a very common design, where the cistern sits directly above the toilet pan. Wall faced toilet: this toilet has a hidden cistern, with the toilet flush against
specifications or delete toilet suite models without prior notification. A failure to follow these instructions, or a failure to have the product installed by a licensed tradesperson, may void the product’s warranty. www.harmonybathroomware.com.au Harmony Installation Instructions - Bassini_V4.indd 5 22/02/2017 12:31 PM 30/12/2016 · Watch our step-by-step video showing how to install a close-coupled toilet, with expert advice and top tips to help you complete the job with confidence. Visit the official B&Q YouTube channel
About Caroma. Caroma is an iconic Australian company with over 75 years’ experience in creating bathrooms and kitchens. Our distinctly Australian designs coupled with our leadership in water conservation, lets you create your own dream bathroom and kitchen whilst also helping protect the water of this great land for this generation and the next. 21/08/2010 · Toilet Repairs and Replacements.repair or replace a toilet. leaking running cisterns or the toilet pans are loose, if there are smells coming from a toilet If the toilet cistern is old it is a
PLUMBERS' INSTALLATION INSTRUCTIONS For Prima 4.5-3 Vitreous China Close Coupled Toilet Suite PLEASE READ CAREFULLY BEFORE INSTALLATION Pan foot level Height of “P” trap Cement bedding position 10mm Silicone bedding position max. 5mm around foot Level pan when bedding Finished floor level 185 Finished Wall Important: Do not use the pan BASE LINK TOILET SUITE INSTALLATION INSTRUCTIONS INSTALLATION INSTRUCTIONS 10 mm 8 mm 3 mm In masonry, drill 8mm diameter holesou and insert the plugs provided. In timber, drill 3mm diameter pilot holes. Leave the screws protruding by 10mm. Flush the water supply line. Make sure that the strainer is in place. Then fit the water supply pipe using
8. Fill the cistern and ensure correct water level. For adjustment refer separate instructions for inlet. 9. Fit cistern lid and flush toilet. Check for leaks. For adjustment and troubleshooting on outlet valve refer separate instructions INSTALL WAX SEAL Invert toilet on floor (cushion to prevent damage), and install wax ring evenly around waste flange (horn), with tapered end of ring facing toilet. Apply a thin bead of sealant around toilet base. POSITION TOILET ON FLANGE a. Unplug floor waste opening and install toilet on closet flange so bolts project through mounting holes